Mick Doohan and the Honda NSR500


Click on image to get a 800X600 wallpaper!
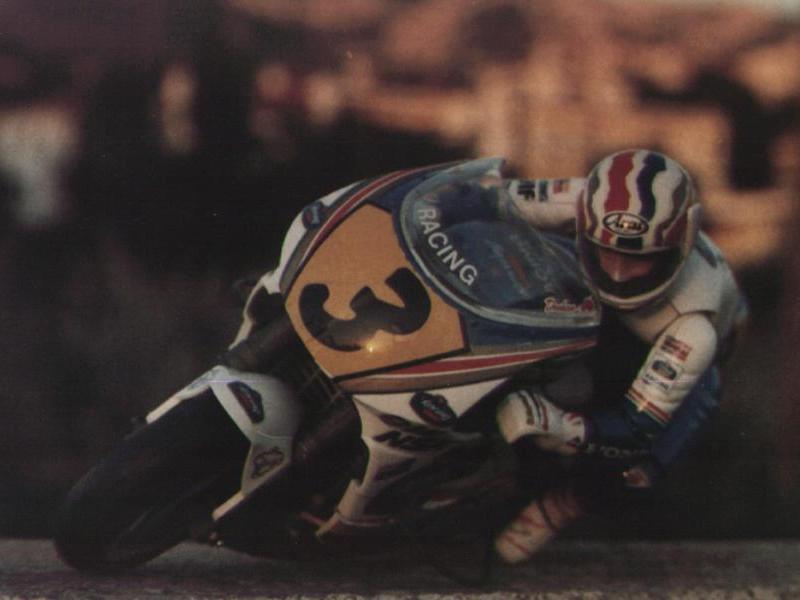
Click on image, above, to get a 40kb, 800X600 wallpaper!
Here's how to convert this image to a Windows wallpaper


Now that the World 500 cc Championship has ended with Mick Doohan once again on top, it is a good chance to take a good look at the radio controlled bike that Kyosho has produced in 1995.


Technically speaking...


This is how the rider moves. The mechanism is connected to the steering servo and via links it does a larger movement than the forks. The rider's head is connected to this system and moves accordingly.
In the next few lines we'll try to describe the assembly, along with painting tips and accessories we put on the bike, while building it.
The first and most important thing is to have the radio control gear in hand, before starting the assembly, as you will need the servo and the speed control/receiver in the first few steps!
Otherwise, you'll have to disassemble the bike completely to fit the electronics inside it. Double trouble!
Lets at first see the technical differences of the new bike, along the older one. First and foremost change is the chassis. Instead of being made of two plastic tubs split vertically and held together with five screws, now the frame is a Deltabox lookalike. The new design has its advantages: The frame is more rigid than before, which is good for the handling, while, at the same time receiver crystal access is better now, through the space frame. Also, a motor change is a lot easier now. The design of the rear swing arm is similar to the old. The wheels and the design of the brakes are exactly the same, even matched in wheel and tire dimensions.
One other main difference is in the battery holder. It can accept the narrow 270 mAh batteries, just like the old model, but it can easily accommodate the new 600 mAh battery, which is physically larger, and provides lots more running time, especially useful when you have fitted a faster motor!
The fairing and the rest plastic items are following closely to the lines of the real bike, being as scale as possible.
The "raison d' etre" of this new bike, however, is the ability of the rider to follow the movements of the bike! In fact, the rider's arms and legs are articulated, being able to "transfer weight" to the inside of the corner! This is the most important change and the very best reason to buy the bike!
All this is good so far... The down side is the added weight of the mechanism that moves the rider around and the articulated parts with all those small parts involved...


Assembling the bike and rider...


The assembly is divided in 25 steps, which, if followed to the letter, should provide no problem. It took us about two and a half hours to build the bike, without doing any painting or putting any of the almost 90 (!) stickers.
Modelling skill will be appreciated, but even an inexperienced model builder will have no real trouble, if he/she follows the instructions. Some special tools are given with the kit, such as an allen wrench for the single allen-screw, along with a cross-spanner which is used only for tightening the wheel axles.
The extra tools you'll need are described in the first page of the assembly manual. I'll add to these a thin Phillips screwdriver, for the small 2X8 mm screws which hold the balls on the rider's arms and legs.
The instructions are crystal-clear. I'll have to recommend you to be patient and not open all the small nylon bags together, but follow the instructions, which tell you in each step what exactly you'll need.
The naked frame looks almost
like the real thing!
But where's the V4?!


Painting and applying the stickers

Painting can easily be accomplished using a small brush. In truth, you'll not really need an airbrush, since the largest flat area is the top of the fuel tank. The colors we used were Humbrol and Molak enamels: #14 blue, matches best the blue color of the Rothmans logo. Molak's #26 Aluminium was used to paint the frame, swingarm and the radiator grille, while various details were hilighted with #16 Gold from Humbrol. The front forks should be painted with gun-metal (Humbrol #53), before assembly, so that the chrome sliders don't get painted, too! The white color of the plastics was left unpainted. It looks just fine as it is. The rider's face was painted with a mix of red, yellow, pink etc in an attempt to resemble the human flesh color.
Putting on the stickers is no real threat, except for the fact that it is... time consuming! Some hints on making your life easier with the stickers: For big ones, apply a little water on the surface, where the sticker is intended to go, so moving it around will be a lot more easy. After finding the correct postition, you can get rid of the water, by squeezing the sticker slowly, from the center towards its outer edges, using a dry fabric. When trying to apply a "flat" sticker to a curved area, (of which this bike has a lot!), position the sticker to the right postition, then squeeze lightly, towards the outer edges, until small creases appear. Do not press on them, because, this way you'll have a "folded" sticker. It's better to have a... smoking person nearby. Using the hot end of a cigarette, you can shrink the nylon sticker, to a degree, of course. Then squeeze! If after applying this method, creases still exist, try cutting with a sharp X-akto or similar cutter right on the top of the crease and overlap each other. If smoking is not allowed, try to do it with a soldering gun, but be extremely careful not to burn your fingers, or the sensitive nylon. In any case, you should never touch the sticker with either warming method, but just fetch it as closely as possible.


Accessories


The LeMans DMC20BB is
good for 20000 rpm, says Kyosho!
The rear shock has adjustable spring preload,
although it's very difficult to reach.
The accessories we had available were rather few, and all came from our older "donor" bike, the one with Mr. Schwantz aboard, wearing the Pepsi colors. These were: The rear hydraulic shock, the full ball bearing set, constisting of four items for the wheels (size: 5X10 mm) and four small ones for the transmission (size: 3X6 mm).
Also the LeMans DMC20BB motor was available, so we threw it in too! All these, in an attempt to give the bike a little more go... However, I'd recommend only the suspension and the ball bearing upgrades for a starter, since the bike is already a handful to "ride" with the standard motor. After trying it, yourself, though, you'll agree with me that this motor is not that "slow" at all! The bike's transmission certainly needs some kind of "running in". It seems that no matter what or how much grease you put to the gears, the transmission is rather tight at first.


The Wish list...


The hydraulic forks. No adjustments here, but they are smoother than the standard forks.
Adjustable and ballraced steering head!
This is the definitive wishlist for the bikes: An oil-filled aluminum-bodied upside-down fron fork! Woa! Isn't this enough, though? Then, there's the adjustable steering head. This is also ballraced, while at the same time it can act like a steering stabiliser on a real motorcycle. Then, if traction is minimal, you should try the high-grip tires with foam inserts. The front wheel is heavy in reaction, right? Try the lightweight flywheel. At last but not the least, speed is not what you'd consider as "fast". Try this motor: Grand Prix 28BB. And then there's a set of steel pinion gears, along with a set of metal transmission gears. I reckon that most of these items are hard to find, even more than the bikes themselves. I have done a little research in some European countries, as well as in the USA, too. There are currently only a few places where the bikes can be found, and if the interest seems to grow, they could fetch the options, too. The Kyosho distributors in Athens, Greece, where I live, last year brought a rather large batch of bikes, around 30 to 40 pieces. Well, mine was one of the last two or three that there were left unsold. Nevermind spares or option parts. All this info has come my way by either Kyosho's own Yearbooks, or specific model advertising banners, shown once in a while on hobbystore walls. Also, some info and specs can be found on the bikes' assembly manuals.


The Test Ride...


...we've been waitng for, is here at last! The first time you hold your bike in your hands, fully loaded and ready to run, you realize that it seems a little heavier than the older models which can also be verified from the spec table at the end of the article.
With all my 270's peak charged, I'm ready for my neighbour schoolyard, the one with the new asphalt! He he! This is going to be fun! The first run is rather slow and in a straight line, trying to adjust the trims. Oops, it's braking itself when I leave the throttle. Now, it's OK, let's give it full blast... Straightline speed is not particularly something to write home about, especially if you've seen those 1/10 on-road pan cars with the 12X2 modifieds and the hot Sanyos! However, the big fun is next.
Turns! Let's try a few turns. With half throttle, and slight steering inputs, the bike leans, the rider hangs his knee and elbow to the inside of the corner, while his head is pointing to the same place... A little more steering makes the side guards touch the ground with a hiss, but the bike is not upset! The rear shock is doing its job. And it's doing it pretty well! I try to make the circles smaller and smaller. With so little throttle the bike "stalls" and leans on its side guard. I try this trick, to make it start from the ground, itself, without touching it. It works here, on this fresh and harsh asphalt! The trick is simple: Turn all the steering to the side that the bike has leaned and then apply gradually the throttle. The bike at first is dragging its side guard and then starts to widen the circle, while I give it a little more throttle. After a circle and a half it's up and running. That simple!
The most fun is to give the transmitter to a friend of yours and guide him to drive around you, while you're kneeled to the ground, or even better, lie down! It's amazing from this angle. The scale moves of the rider are simply outstanding...
Unfortunately, it starts raining, so I pack it up without a scratch and head for home. Let's hope the rain will stop soon, so I can tape a few photos...
So far so good... The bike is now standing on my office, pretty as a plastic display model, only we know too well it has its own life...


Model Specifications

. Old Model New Model
Length 270 mm 270 mm
Width 94 mm 98 mm
Height 184 mm 190 mm
Weight 680 gr 750 gr
Wheelbase 185 mm 185 mm
Gear ratio (overall) 13.8:1 to 19.3:1 13.8:1 to 19.3:1
Some notes on the table: Weight is measured with electronics and 270mAh batteries on both models. Width is measured without adding the protective bars, but at the handlebars.


back to the top...
Back home...
(All photos in this page are from the Kyosho 1996 catalog)